on
DSLR timelapse
WARNING This post was added before its time. It is incomplete (missing a proof-read, some pictures), and is only posted as-is in order to test my developing framework for pictures.
I’ve started a new project: using a Raspberry Pi to create a timelapse on a DSLR. I’ve recently moved to Binghamton NY, and from my 8th floor apartment, I have an amazing view of rolling hills. In the morning, clouds cover the summits. Preludes to rain drape the sky in rolling whites and greys. But I can’t communicate any of this to my parents back in Singapore, and while words could paint a picture, an actual picture is worth a 1000 words. And I imagine a timelapse is worth a million or so.
I had a bit of a challenge figuring out how to do a timelapse. This is a tutorial that I hope will help someone else facing the same challenges. I used my DSLR in this tutorial, but most cameras are supported. See here to see compatible cameras and available functionality.
Putting it together: the hardware
I already have a DSLR 700D. I also have a raspberry pi. It’s a simple task to connect the two.
- raspberry pi B+ with a 5v 2.5A power supply
- DSLR
- USB to mini-usb or whichever cable connects to your camera
Putting it together: code
gphoto2
The code is extremely simple. But like most of my DIY projects, I came across problems that are caused because tech hates me as much as I love it. I will say now that the tutorials I used to put my project together are somewhat outdated or have an inefficent approach. For example, in the pimylife: Raspberry Pi DSLR Camera Control tutorial, don’t install gphoto2 to the raspberry pi from GitHub. I recommend just using your package manager.
# debian/ubuntu/pop-os
sudo apt install gphoto2
Installing gphoto2 from github gave me a headache. It would detect the camera, but unable to capture photos. If gphoto2 installed correctly, run the following:
# is gphoto2 installed?
gphoto2 --version
If it worked, try connecting your DSLR to the pi and running the following. It should return the name of your camera:
gphoto2 --auto-detect
Simple bash script
Now you need a script to control the camera. Gphoto2 has a series of configurations that can be setup. Things such as aperture, shutter speed, white-balance, etc. The avilable configurations change camera-to-camera. See the documentation to see whats avilable for your camera. These configurations can be set using –set-config. The first thing you want to state in the script is where to save the photos. This was one of my original headaches.
# Where to save the script: DSLR's SD-card (1)
gphoto2 --set-config capturetarget=1
after that, I created a simple loop that waited for x period of time before taking another photo:
x=1
until [ $x -gt 10 ]
do
	gphoto2 --capture-image --camera 'Canon EOS 700D'
    # x=$((x+1))
    echo $x
    sleep 2m
done
Don’t forget to replace the variable given for --camera with your own camera ID!
To change how long the gap between photos is, you can simply adjust the value for sleep. Right now,
its every 2 minutes. You can set it up for every x seconds (sleep xs), x hours (sleep xh), or
fraction of time (sleep xs ym zh). This gives this very simple bash script that will take photos
non-stop until the script is ended.
#!/usr/bin/env
# Author: SNTag
# Date: 2020-Oct-25th

# Where to save the script: DSLR's SD-card (1)
gphoto2 --set-config capturetarget=1

# time-loop
x=1
until [ $x -gt 10 ]
do
    gphoto2 --capture-image --camera 'Canon EOS 700D'
    # x=$((x+1))
    echo $x
    sleep 2m
done
You might have noticed the commented-out line x=$((x+1)). I wrote the code this way initially to limit the number of pictures taken in the timelapse to 10 photos. You might want to make use of this functionality too, just uncomment that line and replace the 10 in until [ $x -gt 10] with your own number.
Running the bash script
Running the bash script could be different person-to-person. If you have a screen and keyboard attached to the pi, its as simple as starting a terminal and running bash on the script. If you did not set up the script to take x number of photos, simply press Ctrl-x to stop the photos. The script could be made more complex, but this works for me.
In a headerless set-up, it can be harder to keep the camera running if the ssh breaks connection. There are two solutions. I recommend using tmux, not the approach I took (I added it to rc.local. I simply restart the pi and it starts working. It makes sense for my unique current situation.).
If using tmux, it’s a simple task to create a session that can be reconnected to whenever you want. I’m learning the details about it now and will update this when I have more experience with it.
Putting it together: blender
Now the final part: creating the actual timelapse. There are probably easier ways to do this, but I opted for blender to compile it. It seems to be highly recommended, and I imagine the depth of tools will help when I start making good time-lapses. Before getting into blender, move the photos you will make a time lapse of to somewhere on your computer and lets do some pre-processing.
Preparing the photos
The first step is to prepare the photos. You will want to make the luminosity for your photos consistent. There is a simple script on github to do this. Don’t worry, this script will NOT affect your original photos! You will want to download this repo to your computer:
# download timelapse-deflicker. will require 'git'
git clone https://github.com/cyberang3l/timelapse-deflicker
Copy the script timelapse-deflicker.pl to where you placed your photos. When run, it will
determine the luminosity per photo in the directory and average them to reduce flickering in the
final steps of making a timelapse! The modified photos will be placed in the same directory under
‘./Deflickered’. To run the script, run this command in the directory:
./timelapse-deflicker.pl -p 2 -v
Blender
Note: I used blender 2.82.
I have never used blender before. I have intentionally missed a few steps to get a finished product. The software is complicated, has tons of features, and out of my league for the time-being. But I did manage to get it working, and this is how I did it.
The obvious first step is to get blender:
# install blender (debian/ubuntu/pop-os)
sudo apt install blender
After starting blender, there should be an options menu. Select ‘video editing’.

From there, import pictures by clicking ‘add > Image/Sequence’ button. It should be roughly in the middle-left of the screen. Move to the directory with the deflickered photos and import.

You should now have your photos in blender and running as a timelapse! Now it’s time for some adjustments to the video itself. On the bottom right corner, you should see ‘start’ and ‘end’. You will want to modify the ‘end’ value to end around where your timelapse ends. If you cant get the exact value, you can drag the end of the photo-region to extend/compress it.
Move to ‘Output Properties’, and modify the frame rate in ‘Output Properties > Dimensions’ as shown below. Each ‘frame’ in frame rate is a picture. So 24fps is 24 images per second. That may be too fast or too slow depending on the number of pictures you took.

Move to ‘Output Properties > Output’, and select the file format you want it as. I used FFmpeg. Importantly, under ‘Output’, you will see where rendered videos will go to. On my computer, its ‘/tmp/’. Make sure to remember this or change it as appropriate. You may also want to mess with compression with change the picture quality, its up to you.

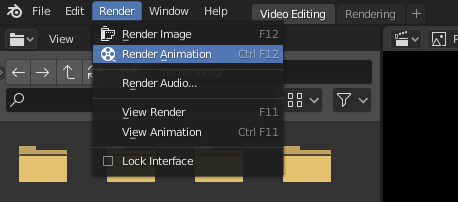
Finally, on the task menu, select ‘Render > Render animation’. A separate window will pop up, showing each frame of your time-lapse in slow motion. This is the system rendering your movie. Don’t close this window and wait for it to finish. This step will take a while.
Once it’s done, you can close the extra window. The final movie has been rendered to the directory mentioned above (for me, ‘/tmp/'). Go to that directory and look for the right video file.
Future plans
After all of this, you should have a final product! The very first timelapse I have made using this approach can be found here! Its not quite in the style I want. My DSLR failed to get a proper focus in some of the frames. I’m not sure how to solve this problem. I would assume that setting the focus to infinity should do it, but my lens does not have any focus indicators.
Other possible improvements require being gear hungry…and by gear, I also mean the kind in motors. I hope to build my own camera slider. That is a project I can do easily enough with the raspberry pi as well. I’m hoping to eventually develop this project to take a timelapse of seasons as seen from my window. I face other challenges too. The battery is nowhere near enough. My first timelapse was as short as it was because the battery died. I need to get either an expanded camera grip with room for multiple batteries or a dummy battery. Since I can’t find a reputable dummy camera at a reasonable price (I am not going to risk my DSLR with the 20-30USD batteries I have seen), the best option is to increase battery supply.
References
BLOG — Joe Giampaoli: Time-lapse Photography with Linux
BLOG — Alister’s Skygazing: Blender Time-Lapse Tutorial
YOUTUBE — Blender 2.8 Video Editing - Video Speed / Time Lapse